Data Backup
If you are unable to Upload the Records due to Low Internet Connection, you can use this feature.
Sender : The Person who wants to Transfer the Data to another mobile.
Receiver : The Person who will Receive and Upload the received Data.
Navigation
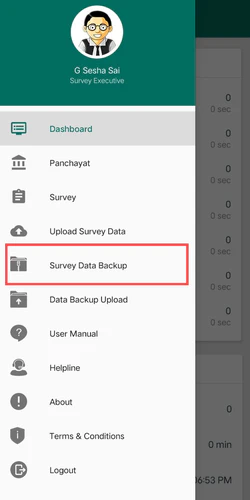
- Open the Menu on the top left corner of the Dashboard Screen.
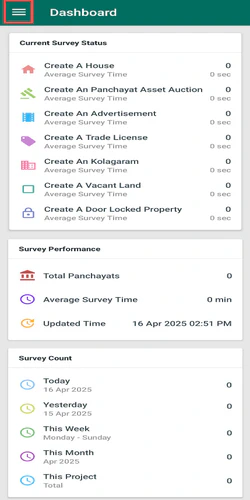
- From the Side Menu, select the Survey Data Backup.
- After clicking on the Survey Data Backup, you will be moved to the Survey Data Backup Screen.
Title Section
At the top of the Data Backup Screen, you will able to see the following information :
- Menu : It is located at the top left corner and if you click on this, a Side Menu will be opened.
- Title : Survey Data Backup
Details Section
Hotspot Connection Setup
- The Receiver should turn on the Mobile Hotspot.
- The Sender should turn on the Wi-Fi and connect to the Receiver’s Mobile Hotspot to start the Data Backup.
Device Connection
- Once the two mobiles are connected, the Sender and Receiver’s mobiles will display the Survey Data Backup Tutorial, Instructions and along with the respective buttons :
- Sender : Sender can see the Send Data button.
- Receiver : Receiver can see the Receive Data button.
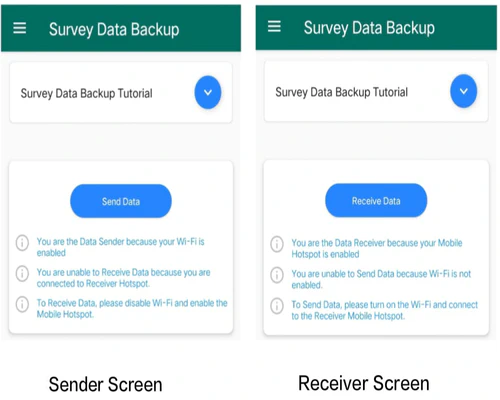
The Send Data button will be only visible when the Sender is connected to the Receiver’s Hotspot.
- Sender : Sender can see the Send Data button.
- The Sender should click on the Send Data button to send the Data.
- The Receiver should click on the Receive Data button to receive the Data.
IP Address Setup Process
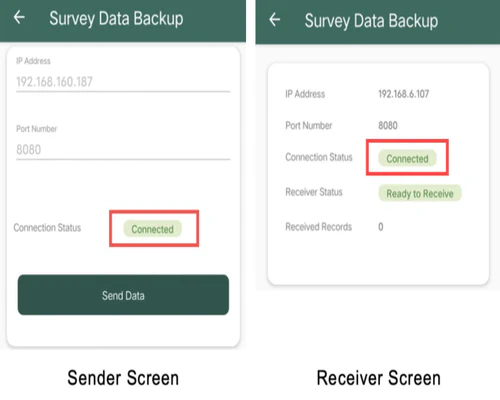
- Initially, the connection status on both the devices will displayed as Not Connected.
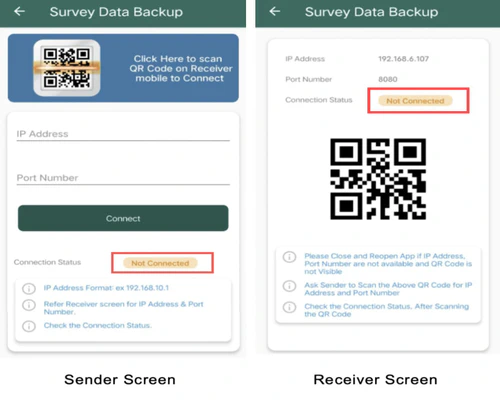
- The Sender can receive the Receiver’s IP Address and Port Number using one of the following methods:
QR Code Scan
- The Sender should scan the QR code from the Receiver’s Screen then the IP Address, Port Number will displayed automatically.
- The connection status will be updated to Connected on both the devices.
Manual Entry
-The Sender manually enters the Receiver’s IP Address and Port Number displayed on the Receiver’s mobile. -Click on the Connect button, then the connection status will be updated to Connected in both the devices.
If you click on the Connect button without receiving the IP Address and Port Number then an message will be displayed at the bottom of the screen as " Please Provide Valid Receiver IP & Port Number “.
Initiating Data Transfer
- Once Sender and Receiver’s Mobiles are connected, both the screens will displays as follows :
- Receiver’s Screen : The Receiver’s Screen will display the Receiver Status as Ready to Receive and remains on the same screen, waiting to receive the data from the Sender.
- Sender’s Screen : The Sender’s Screen will display the Send Data button and click on it to send the Data. .
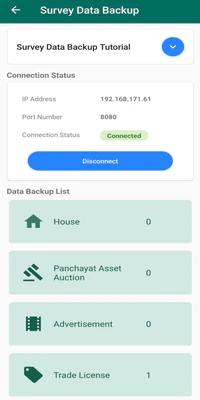
- After clicking on the Send Data button by the Sender, the Sender Screen will move to the Next Screen in which it displays the Survey Data Backup Tutorial, Connection Status and Data Backup List.
Data Transfer
- The Sender clicks on the Trade License from the Data Backup List, which moves to the Trade License Data Backup Screen and displays the Send Backup Data section.
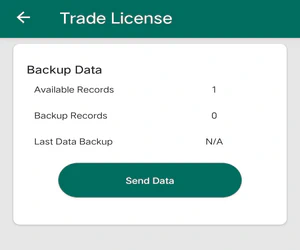
- Backup Data : To Backup the Available Records.
- Available Records : The Number of Records which are available in Sender’s Mobile.
- Backup Records : The Number of Records which are available to transfer to another mobile.
- Last Data Backup : It will displays the exact time and date of the Sender’s recent backup.
- Send Data : It is a button to transfer the Backed up Records to the Receiver’s Mobile.
- Backup Data : To Backup the Available Records.
- By clicking on the Send Data button, the Data Backup records will be backed up and updates the Backup Records count, and displays a message as " Successfully Backup the Records “.
- If there are no Backup Records to transfer to another mobile, the Screen will display No Data to Send will be displayed.
- If you click on the Send Data button again with no new records available, the following message displays a message as ” No latest Records available to Send “.
- If there are no Backup Records to transfer to another mobile, the Screen will display No Data to Send will be displayed.
- Upon clicking the Send button, the following messages display as :
- Sender’s Mobile : ” File Send Successfully “
- Receiver’s Mobile : ” Received Successfully “
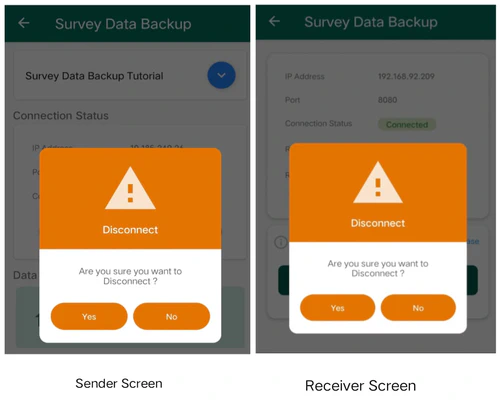
- Once the Receiver receives all the Data Backup Files, the Sender and Receiver can disconnect the Internet Connection or they can continue with the connection.
- If the Sender and Receiver clicks on the Disconnect button, it displays an Alert Box with a message as ” Are you sure you want to Disconnect ? “.
- Click ” Yes “ button, to disconnect the connection.
- Click ” No “ button, to remain the connection active.
As long as the connection remains active, the Sender can transfer the data.
Editing and Deleting cannot be done for Backup Trade License Records.
- If the Sender and Receiver clicks on the Disconnect button, it displays an Alert Box with a message as ” Are you sure you want to Disconnect ? “.