Upload
To Upload the records, you should have a Proper Internet Connection. After successfully creating the records, you need to Upload them into the Panchayat Seva Cloud Server.
Navigation
- Open the Menu on the top left corner of the Dashboard Screen.
- From the Side Menu, select the Upload Survey Data.
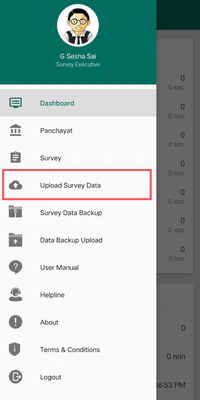
- After clicking on the Upload Survey Data, you will be moved to the Upload Survey Data Screen.
Title Section
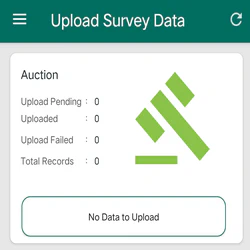
At the top of the Upload Screen, you will able to see the following information :
- Title : Upload Survey Data
- Menu : It is located at the top left corner and if you click on this, a Side Menu will be opened.
- Refresh Icon : It is located at the top right corner and if you click on this, you can refresh the data.
Details Section
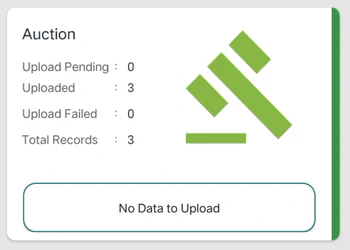
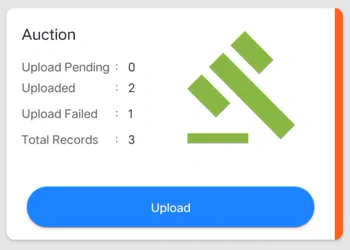
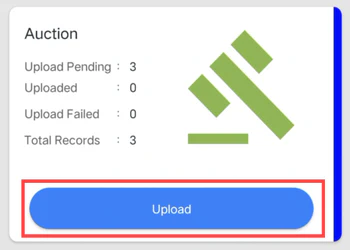
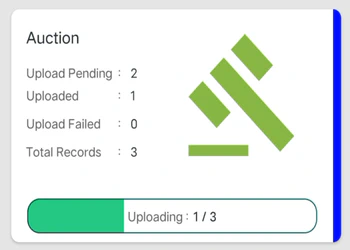
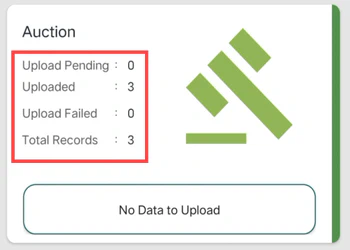
In the Upload Screen, Look for the Auction and you can see the following information :
- Upload Pending Records : The number of records that are Pending to Upload.
- Uploaded Records : The number of records that are Successfully Uploaded.
- Upload Failed Records : The number of records that are Failed to Upload.
- Total Records : The Total number of records (Upload Pending, Uploaded, Upload Failed).
In the Auction Upload section, It Updates different colors based on the Upload Status.
Blue : The record is created but Not Uploaded.
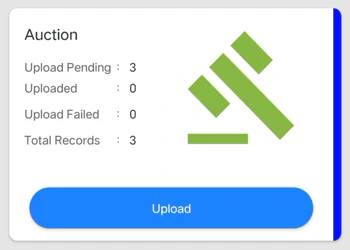
Green : The record is created and Successfully Uploaded.
Orange : The record is created but Failed to Upload.
Upload Process
- Click on the Upload button to start the Upload process.
- You will see a Progress Bar that displays the number of records Uploading.
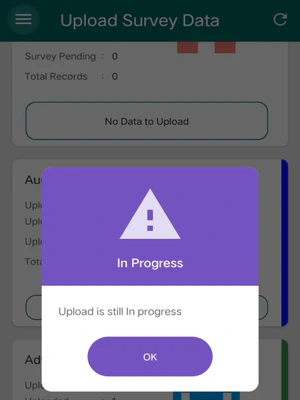
- If you go back while the Upload is in progress then an Alert Box will displays a message as " Upload is still in Progress “ then click OK button to complete the Upload process.
- If you go back while the Upload is in progress then an Alert Box will displays a message as " Upload is still in Progress “ then click OK button to complete the Upload process.
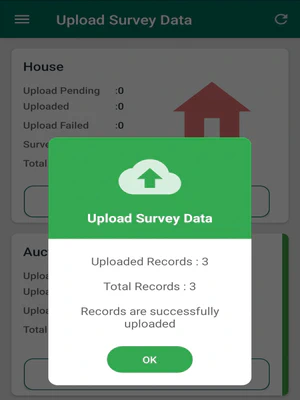
- A Dialogue Box that displays Uploaded and Total Records Count and a message will be displayed as ” Records are Successfully Uploaded “ then click OK button.
- After the records are successfully Uploaded then the Upload button will be updated by No Data to Upload button.
- A Dialogue Box that displays Uploaded, Failed, and Total Records Count and a message will be displayed as ” Few Properties are not Uploaded .Please check the property view page for errors “ then click on the OK button to edit the records.

- The Upload Screen displays the Updated Number of Records that have been Completed or Failed.
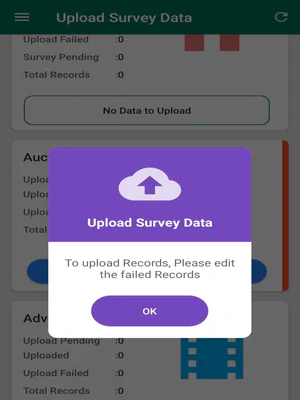
- If you click on the Upload button when the records are failed then a Dialogue Box displays a message as ” To Upload Records, Please edit the failed Records “.
- If you see any Failed records in the Upload Screen, go to the List Screen of Auction and see the reason for the failure in the View Screen.
Flow to view the reason for Failed Record in View Screen :
- Menubar–>Survey–>Auction–>Failed record–>you can see the reason for Failed record.
Once the Upload is Completed, then the record will no longer be available for Editing or Deleting.