House
House in a panchayat is a building that people used to reside regularly.
Navigation
- Open the Survey App.
- Once opened and enter your Username and Password, then click on the Login button.
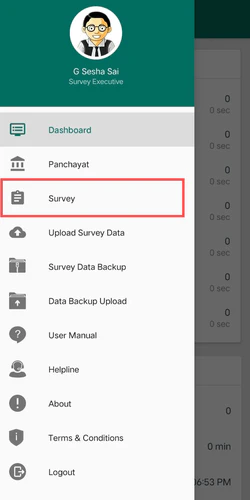
- Once you log in, you will be taken to the Dashboard screen and click on the Menu at the top left corner.
- Select the Survey from the Menu.
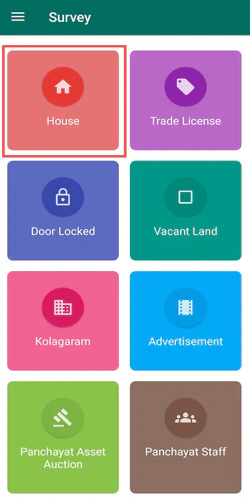
- After clicking on the Survey, you will be moved to the Survey Screen, then look for the House and click on it.
List
From the Survey Screen, click on the House, it moves to the List Screen.
The List screen displays different sections i.e., Title, Statistics, Record.
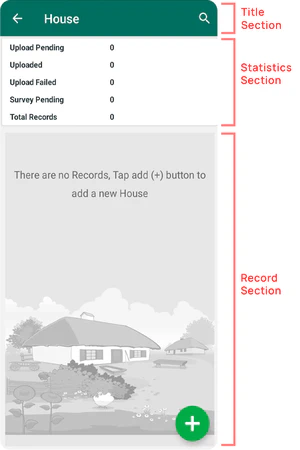
Title Section
At the top of the List Screen, you will able to see the following information :
- Title : House
- Back Icon : It is located at the top left corner and if you click on this Back ( ← ), you will be moved to the Survey Screen.
- Search Icon : It is located at the top right corner and if you click on this Search Icon, it allows you to Search for the records using fields like Door Number, Building Category, Owner Name, Owner Aadhaar Number, Owner Mobile Number.
Statistics Section
In the Statistics Section, you will able to see the following information :
- Upload Pending : The number of records that are Pending to Upload.
- Uploaded : The number of records that are Successfully Uploaded.
- Upload Failed : The number of records that are Failed to Upload.
- Survey Pending : The number of records that are in Survey Pending.
- Total Records : The Total number of records (Upload Pending, Uploaded, Upload Failed, Survey Pending).
Record Section
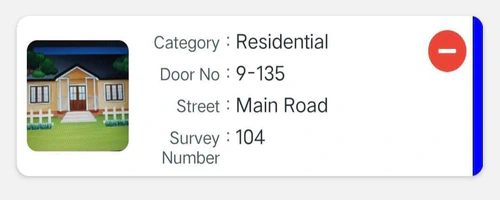
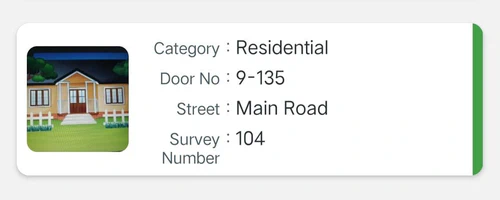
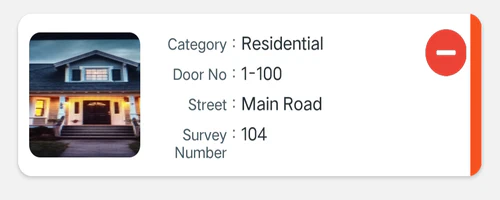
In the Record Section of the List Screen, you can see a list of all created records.
- The list of created records are categorized by color codes, based on their status which are displayed on the right side of each record.
Blue : The record is created but not Uploaded.
Green : The record is created and Successfully Uploaded.
Orange : The record is created but Failed to Upload.
Brown : The record is created but Uploaded through Backup.

- If the List Screen is empty, a message will displayed as “There are no House records available, Tap the Add (+) button to add a new record”.
Create a House
House includes the collection of House Details, Building, Owners, Household Details.
You must fill all the details(House Details, Building, Owner, Household) to create a House. You must fill all the Mandatory fields (*) on the Create Screen.
Title Section
At the top of the Screen, you will able to see the following information :
- Title : Create a House
- Back Icon : It is located at the top left corner and if you click on this Back ( ← ), you will be moved to the List Screen.
- Information icon : It is located at the top right corner and if you click on this Info(), you can see some instructions to create a House Record.
Details Section
In the Create a House section, you will find a list of options that provide to detailed information of the House. Here are the details :
- House Details
- Buildings
- Owners
- Households
- Survey Pending
Households and Owner details will not be available for Exemption Category.
Households details will not be available for Commercial Category.
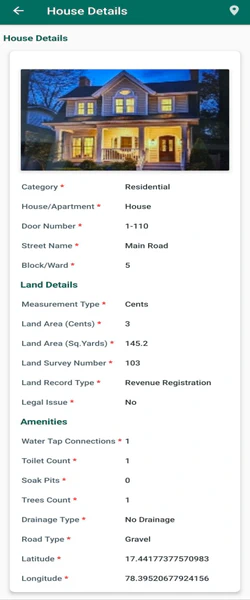
House Details Section
- House Details includes the collection of Building category, land Details & Amenities.
- On the Create a House Screen, click on the Add " + “ button next to the House, it moves to the House Details Screen.
Title Section
At the top of the Screen,, you will able to see the following information :
- Title : House Details
- Back Icon : It is located at the top left corner and if you click on the Back ( ← ) then an Alert Box displays as ” Are you sure you want to go Back ? “.
- Click ” Yes “ button, you will be moved to the Create A House Screen.
- Click ” No “ button, you will be remained in the House Details Screen.
- Click ” Yes “ button, you will be moved to the Create A House Screen.
Input Section
You must fill all the Mandatory fields(*) on the Create Screen.
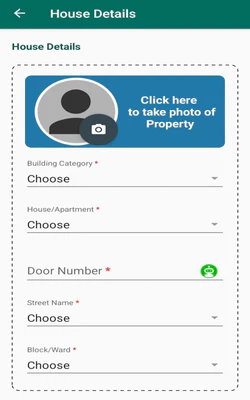
- Click on the Camera section and use your Device Camera to take a photo of the House.
- If you click Next without taking the photo of the property then an Alert Box displays as " Please Capture the Property Photo using Camera “.
- Choose the Building category from the dropdown.
- Exemption: The Houses related to the panchayat where tax is not applicable.
- Commercial: A Building that used for business activities, including retail, offices, hotels, and other revenue generating operations.
- Concession: The land in which the tax has a subsidy collected from retired servicemen.
- Residential: A building in which people to live in.
- Exemption: The Houses related to the panchayat where tax is not applicable.
- Choose House/Apartment from the dropdown (Mandatory Field).
If you choose Exemption in the Building Category, the House option is selected automatically.
- If you select House, you have to enter the Door Number.
- If you select Apartment, additional fields will display :
- Apartment Name
- Community Name
1.If you want to add other flat details, you can click on the Add " + “ button on the List Screen.
- The Apartment site area must be less than 5000 square yards.
- Enter the Door Number of the House.
- Minimum Length 1
- Maximum Length 64
- The Door Number should start with Alphabet or Number, but not with special characters.
- Allowed characters _ - / @ # & . : () , A-Z a-z 0-9
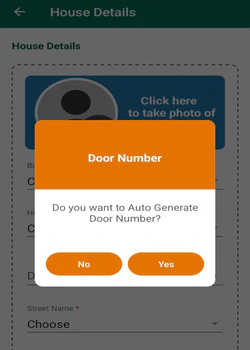
If you click the Auto Generate button of the Door Number, an Dialogue Box will be displays a message as “Do you want to Auto Generate Door Number? “ and then click OK button on the Dialogue Box to Auto Generate the Door Number.
Note: Enter the Door Number for the Apartment as House Number/Flat Number.
- Choose the Street Name from the dropdown where the House property is located (Mandatory Field).
- The Street Name should only start with numbers and alphabets, but not with special characters.
- Allowed Characters _ - / @ # & . A-Z a-z 0-9
- Minimum Length 3
- Maximum Length 64
- If the Street Name is not available in the dropdown, select Others option at the bottom of the dropdown to enter the Street Name in the provided text field.
- The newly added Street Name will be included in the dropdown for the next records.
- If you enter a Street Name in the Others text field that is already listed in the dropdown, a message will be displayed at the bottom of the screen as “Street Name already exists”.
- The Street Name should only start with numbers and alphabets, but not with special characters.
- Choose the Block Number of the House (Mandatory Field).
Land Details
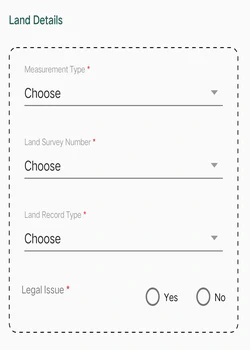
- Select the type of Land Measurement from the dropdown.
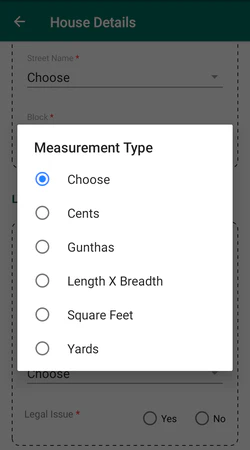
- Depending on your Measurement Type, additional fields will appear for entering the House Measurements.
- The Land Area will be generated automatically in Sq.yards based on the House Measurements entry.
- Select the Land Survey Number assigned to the property.
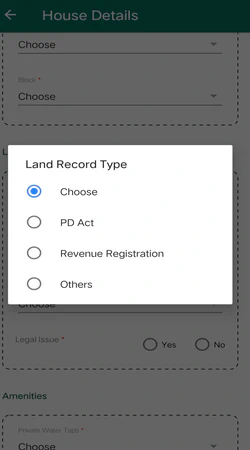
- Choose the Land Record Type assigned to the property.
- Choose Legal issues status associated with that property.
- Select ” Yes “ button, if the property has legal issues (i.e., it is a Legal Land).
- Select ” No “ button, if the property has any illegal issues (i.e., it is an illegal Land).
Amenities
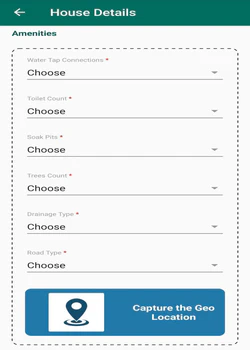
- Select the Water Tap Connections count from the dropdown.
- Select the Toilet Count from the dropdown.
- Select the Soak Pits count from the dropdown.
- Select the Number of Trees Count from the dropdown.
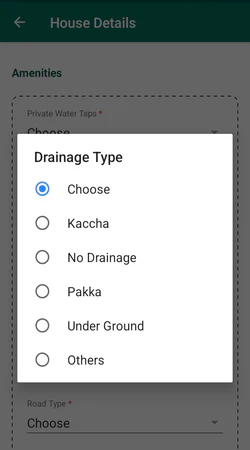
- Choose the appropriate Drainage Type from the dropdown.
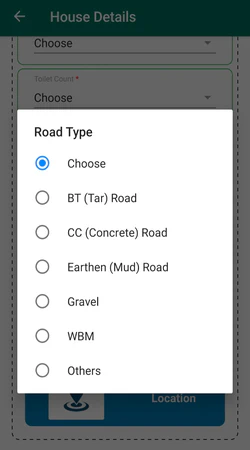
- Choose the appropriate Road Type from the dropdown.
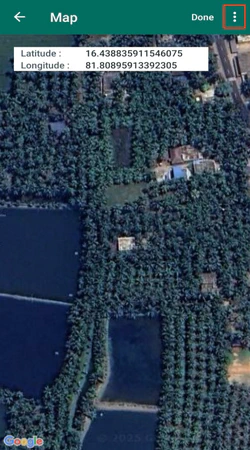
- To Capture the Location, click on the Capture the Geo Location section (Mandatory Field).
- Pin the exact point of the House on the map and click on the Done, then the screen moves back to the House Details Screen.
- If you don’t know the current location, click on the three dots(⋮) at the top right corner. Three options will appear as : Pin Current Location, Pin Previous Location, and Pin Landmark Location.
- Pin Current Location : The Pin will be marked near to the Current Location.
- Pin Previous Location : The Pin will be marked at the Previous Location.
- Pin Landmark Location : The Pin will be marked at the Landmark Location.
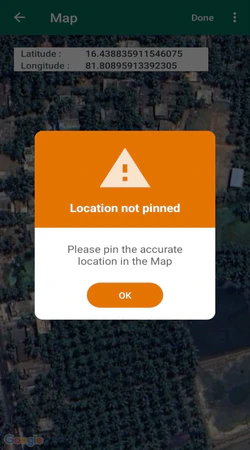
- If you click Done without pinning the Location of the House property, an Alert Box will display a message as ” Please pin the accurate Location in the Map “ and then click OK button on the Alert Box to pin the Location.
- If you click Back ( ← ) on the Map Screen after pinning the Location then an Alert Box will display a message as “Are you sure you want to capture the current Location ? “.
- Click ” Yes “ button, you will be moved to the House Details Screen and Location will be captured.
- Click ” No “ button, you will be moved to the House Details Screen and Location will not be captured.
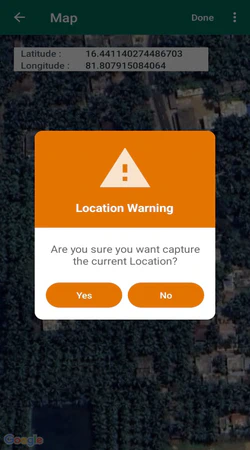
- Click ” Yes “ button, you will be moved to the House Details Screen and Location will be captured.
- If you don’t know the current location, click on the three dots(⋮) at the top right corner. Three options will appear as : Pin Current Location, Pin Previous Location, and Pin Landmark Location.
- If you click Done after capturing the Location, the Geo Location section will be updated by the message displaying Geo Location Captured.
The Geo Location helps the Survey Executive to locate the House property on the map.
- Once all the required fields are filled, click on the Next button which is at the bottom of the Screen, then it moves to the Confirmation Screen.
- If you click on the Next button without entering all mandatory fields then an Alert Box will display a message as “Please fill all the required fields”.
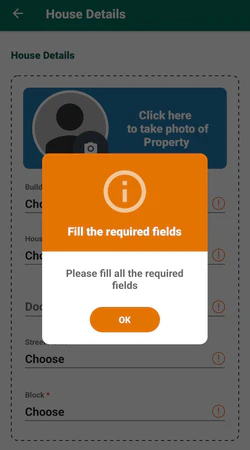
- If you click on the Next button without entering all mandatory fields then an Alert Box will display a message as “Please fill all the required fields”.
Confirmation
On the House Details Screen, click on the Next button, it moves to the House Details Confirmation Screen.
Title Section
On the House Details Confirmation Screen, you will able to see the following information:
- Title : House Details
- Back Icon : It is located at the top left corner and if you click on this Back ( ← ), you will be moved to the House Details Screen.
- Map Pin : If you click on the Map Pin, you can view the Property location.
Details Section
- Verify all the details displayed on the Confirmation Screen.
- After Verifying, click on the Save button at the bottom of the screen and it moves to the Create A House Screen.
- In the Create A House Screen, it displays the newly created Records.
Buildings
- On the Create a House Screen, click on the Add " + “ button next to Buildings, it moves to the Buildings Screen.

You must create the top sections before creating lower sections.
Title Section
At the top of the Screen, you will able to see the following information :
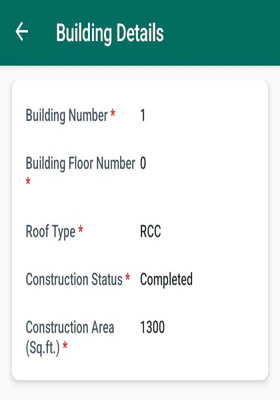
- Title : Building Details
- Back Icon : It is located at the top left corner and if you click on the Back ( ← ) then an Alert Box displays as ” Are you sure you want to go Back ? “.
- Click ” Yes “ button, you will be moved to the Create A House Screen.
- Click ” No “ button, you will be remained in the Building Details Screen.
- Click ” Yes “ button, you will be moved to the Create A House Screen.
Input Section
The Land Area will be generated automatically in Square Yards based on the selected measurement type given in the House Details.
- You can view the Land Area of the Building which was entered during creation of House Details.
- Choose the appropriate Roof Type of the Building.
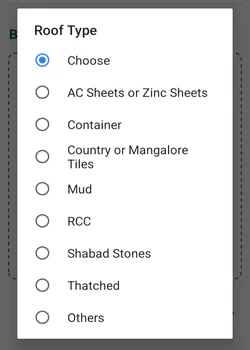
- AC Sheets or Zinc Sheets: Houses built with asbestos cement sheets.
- Container: Houses built from unused shipping containers.
- Country or Mangalore Tiles: Houses made from fired clay.
- RCC: Houses built with cement concrete.
- Add Floor button will only be available for RCC, if the House construction is completed.
- Shabad Stones: Houses built from natural limestone.
- Thatched : Houses built from dry grass or leaves.
- Mud Roof : Houses built from clay or mud.
- Others: Choose the option Others, if above listed Roof Types do not applies to the building.
- Select the Construction Status of the House.
Completed - If the House has walls and a slab.
Not Completed - If the House has pillars or walls but no slab. - If the construction of the House is completed, select Completed.
- If Completed, select Age or Year.
- If the Construction of the House is not completed, select Not Completed.
If the construction year is before 1925, please enter 1925 as the year. If the Age is greater than 100, enter 100. If Age is less than 1, choose the year option.
- If you select a Year before 1925, a message will appear at the bottom of the screen as ” Enter Valid Construction year”.
- If the Construction of the House is not completed, select Not Completed.
- If you choose House, it shows Construction Area.
- If you choose Apartment, it shows Built-Up(Carpet and share of common)(in Sq.ft.).
. Enter the Construction Area/Built-Up(Carpet and share of common)(in Sq.ft.).
- Ensure that the Construction Area is less than or equal to the Land Area.
Please refer to Sale Deed or Record of Rights Documents.
- If the Construction Area is greater than the Land Area, an Alert Box will displays a message as “Total Construction Area should be Less Than or Equal to Land Area”.
Measurement Type value /9 = Land Area
- Ensure that the Construction Area is less than or equal to the Land Area.
- Once all the required fields are filled, click on the Next button which is at the bottom of the Screen, then it moves to the Confirmation Screen.
- If you click on the Next button without entering all mandatory fields then an Alert Box will display a message as “Please fill all the required fields”.
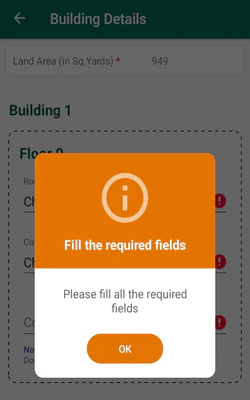
- If you click on the Next button without entering all mandatory fields then an Alert Box will display a message as “Please fill all the required fields”.
Confirmation Screen
On the Building Details Screen, click on the Next button, it moves to the Building Details Confirmation Screen.
Title Section
At the top of the Confirmation Screen, you will able to see the following information:
- Title : Building Details
- Back Icon : It is located at the top left corner and if you click on this Back ( ← ) you will go back to the Building Details Screen.
Details Section
- Verify all the details displayed on the Confirmation Screen.
- After Verifying, click on the Save button at the bottom of the screen and it moves to the Create A House Screen.
- In the Create A House Screen, it displays the newly created Buildings.
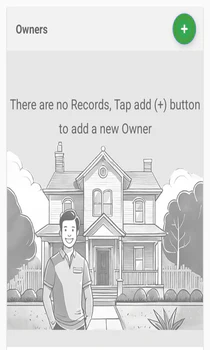
Owners
- Owner Details includes the collection of Owner’s Name, Aadhaar Number, Mobile Number etc.
- On the Create A House Screen, click on the Add " + “ button next to Owners, it moves to the Owner Details Screen.
You must fill the top sections before creating lower sections.
Title Section
At the top of the Screen, you will able to see the following information :
- Title : Owner Details
- Back Icon : It is located at the top left corner and if you click on the Back ( ← ) then an Alert Box displays as ” Are you sure you want to go Back ? “
- Click ” Yes “ button, you will be moved to the Create A House Screen.
- Click ” No” button, you will be remained in the Create Owner Details Screen.
- Click ” Yes “ button, you will be moved to the Create A House Screen.
Input Section
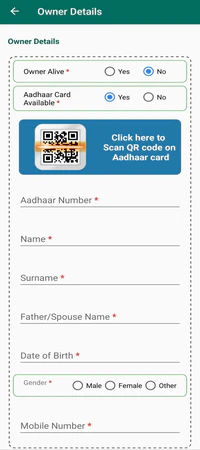
If Head and Owner are same and head is alive and but does not have an aadhaar card, consider this as door locked.
- Select Owner Alive status.
- Select ” Yes “ button, if the Owner is Alive and scan the Owner’s Aadhaar Card .
- Select ” No “ button, if the Owner is Dead and Aadhaar Card Available field will be displayed.
- Select Aadhaar Card Available status.
- Select ” Yes “ button, if the Owner’s Aadhaar Card is available and scan the Owner’s Aadhaar Card .
- Select ” No “ button, if the Owner’s Aadhaar Card are not available and a random Aadhaar Number will be generated and fill the other fields manually.
- Once all the required fields are filled, click on the Next button which is at the bottom of the Screen, then it moves to the Confirmation Screen.
- If you click on the Next button without entering all mandatory fields then an Alert Box will display a message as “Please fill all the required fields”.

- If you click on the Next button without entering all mandatory fields then an Alert Box will display a message as “Please fill all the required fields”.
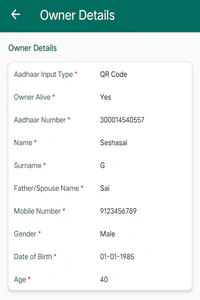
Confirmation Screen
On the Owner Details Screen, click on the Next button, it moves to the Owner Details Confirmation Screen.
Title Section
At the top of the Confirmation Screen, you will able to see the following information :
- Title : Owner Details
- Back Icon : It is located at the top left corner and if you click on this Back ( ← ) you will go back to the Owner Details Screen.
Details Section
- Verify all the details displayed on the Owner Details Confirmation Screen.
- Click on the Save button at the bottom of the screen and it moves to the Create A House Screen.
- In the Create A House Screen, it displays the newly created Owner Details.
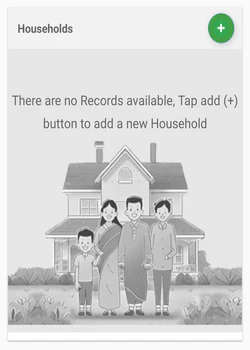
Households
- Household Details includes the collection of Household utilities, Household Head and Member Details etc.
- On the Create a House Screen, click on the Add ” + “ button next to Households, it moves to the Household Details Screen.
You must fill the top sections before creating lower sections.
Title Section
At the top of the Screen, you will able to see the following information :
- Title : Household Details
- Back Icon : It is located at the top left corner and if you click on the Back ( ← ), it moves to the Create a House Screen.
Input Section
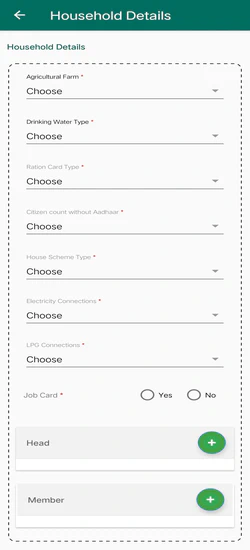
- Choose Agricultural Farm from the dropdown.
- Choose Agricultural Farm Water Type from the dropdown.
- Choose Drinking Water Type from the dropdown.
- Choose Ration Card Type from the dropdown.
- Choose Citizen count without Aadhaar from the dropdown.
- Choose House Scheme Type from the dropdown.
- Choose Electrical Connections from the dropdown.
- Choose LPG Connections from the dropdown.
- Select Job Card Status.
- Select ” Yes “ button, if Job Card is Available.
- Select ” No “ button, if Job Card is not Available.
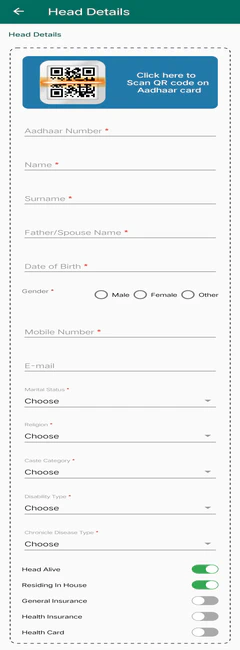
Head
- Head Details includes the Collection of the Family Head Details.
- On the Household Details Screen, click on the Add ” + “ button next to Head, it moves to the Head Details Screen.
You must create the top sections before creating lower sections.
Title Section
At the top of the Screen, you will able to see the following information :
- Title : Head Details
- Back Icon : It is located at the top left corner and if you click on the Back ( ← ), you will be moved to the Household Details Screen.
Input Section
Dead Persons cannot be created as Head.
Based on the Entered Date of Birth, the options for Marital Status, Education Qualification, and Occupation will be displayed.
- Enter the Head Details.
- For Further Head Details, please click here (click on this link).
- Enter the Mobile Number of the Member (Mandatory Field).
- Enter the Email of the Head (Optional Field).
- Choose the Religion of the Head (Mandatory Field).
- Select the Maritial Status of the Head (Mandatory Field).
- Select the Caste Category of the Head (Mandatory Field).
- Choose the Disability Type of the Head from the dropdwon (Mandatory Field).
- Select the Education Status of the Head from the dropdown (Mandatory Field).
- Based on the Education Status, other fields will be generated.
- No Other Fields will be generated for Illiterates.
- Based on the Education Status, other fields will be generated.
- Select the Education Qualification and Occupation of the Head from the dropdown (Mandatory Field).
- Choose the Chronicle Disease Type of the Head from the dropdown (Mandatory Field).
- If Head is Alive, Turn on the button.
- If Head is Residing in House, Turn on the button.
- If the Head has Health Insurance, turn on the button.
- If the Head has General Insurance, turn on the button.
- If the Head has a Health Card, turn on the button.
- Once all the required fields are filled, click on the Next button which is at the bottom of the screen then it moves to the Head Details Confirmation Screen.
- If you click on the Next button without entering all mandatory fields then an Alert Box will display a message as “Please fill all the required fields”.
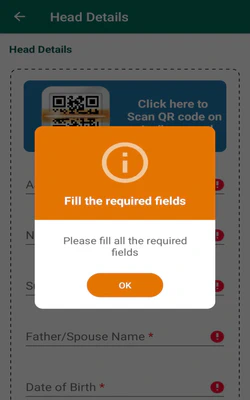
- If you click on the Next button without entering all mandatory fields then an Alert Box will display a message as “Please fill all the required fields”.
- Verify all the details displayed on the Head Details Confirmation Screen.
- Click on the Save button at the bottom of the screen and it moves to the Household Details Screen.
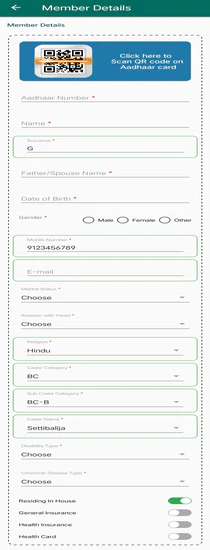
Member
- Member Details includes the Collection of the Family Members details.
- On the Household Details Screen, click on the Add ” + “ button next to Member, it moves to the Member Details Screen.
You must create top sections before creating lower sections.
Title Section
At the top of the Screen, you will able to see the following information :
- Title : Member Details
- Back Icon : It is located at the top left corner and if you click on the Back ( ← ), you will be moved to the Household Details Screen.
Input Section
The Surname, Mobile Number, Religion, Caste Category, Sub-Caste Category, Caste Name will be automatically generated in the Member details when the details are provided at the time of creation.
- Enter the Member Details.
- For Further Member Details, please click here .
- You can add Multiple Members by clicking on Add ” + “ button next to the Member in Household Details Screen, if needed.
A New Born Baby without Aadhaar card cannot be created as a Member.
- Enter the Mobile Number of the Member (Mandatory Field).
- Enter the Email of the Member (Optional Field).
- Select the Maritial Status of the Member (Mandatory Field).
- Choose the Relation with Head of the Member (Mandatory Field).
- Choose the Religion, Caste Category, Sub-Caste Category, Caste Name of the Member, if Both are different for Head and Member (Mandatory Field).
- Choose the Disability Type of the Member from the dropdwon (Mandatory Field).
- Choose the Education Status of the Member from the dropdown (Mandatory Field).
- Based on the Education Status, other fields will be generated.
- No Other Fields will be generated for Illiterates.
Based on the Entered Date of Birth, the options for Marital Status, Education Qualification, and Occupation will be displayed.
- No Other Fields will be generated for Illiterates.
- Based on the Education Status, other fields will be generated.
- Choose the Education Qualification and Occupation of the Member from the dropdown (Mandatory Field).
- Choose the Chronicle Disease Type of the Member from the dropdown (Mandatory Field).
- If Member is Residing in House, Turn on the button.
- If the Member has General Insurance, turn on the button.
- If the Member has Health Insurance, turn on the button.
- If the Member has a Health Card, turn on the button.
- Once all the required fields are filled, click on the Next button which is at the bottom of the screen then it moves to the Member Details Confirmation Screen.
- If you click on the Next button without entering all mandatory fields then an Alert Box will display a message as “Please fill all the required fields”.
- If you click on the Next button without entering all mandatory fields then an Alert Box will display a message as “Please fill all the required fields”.
- Verify all the details displayed on the Member Details Confirmation Screen.
- Click on the Save button at the bottom of the Confirmation screen and it moves to the Household Details Screen.
- Click on the Done button at the bottom of the Household Details screen and it moves to the House Screen.
Survey Pending
- At the Bottom of the Create A House Screen, you have to select whether the survey for the House is still pending or completed.
- Click Yes button, If the Survey is still in progress.
- Click No button, If the Survey is completed.
- Once you have entered all the required details to create a House and marked the Survey status then click the Done button, and it moves to the House List screen.
- On the List Screen, it displays the newly created House Records.
View and Edit
On the List Screen, Select a House Record to View or Edit.
Title Section
At the top of the View Screen, you will able to see the following information :
- Title : You can view the Title of the Screen.
- Back Icon : It is located at the top left corner and if you click on the Back ( ← ) then an Alert Box will display a message as ” Are you sure you want to go Back ? “.
- Click ” Yes “ button, you will be moved back to the List Screen.
- Click ” No “ button, you will be remained in the Edit Screen.
- Click ” Yes “ button, you will be moved back to the List Screen.
- Edit : If you click on the Edit, you will be moved to the Edit Screen to modify the changes.
- Information Icon : It is located at the top right corner and if you click on this Info(), you can see some instructions to create a House Record.
Details Section
- If changes are needed, click on the Edit which is located on top right corner, it moves to the Create A House Screen.
- Click on the (House/Buildings/Owners/Household) section you want to edit, and it moves to the selected View screen.
- Review the details in the View screen.
- Click on the Edit, you will be moved to the Edit Screen to modify the changes.
- Click on the Next button, it moves to the Confirmation screen.
- Editing can only be done before the House Record is uploaded.
- Click on the Finish button to save the changes and it moves to the Create A House Screen.
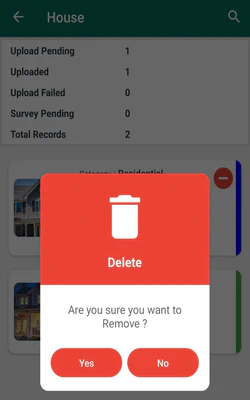
Delete
Deletion can only be done before the House Record is Uploaded.
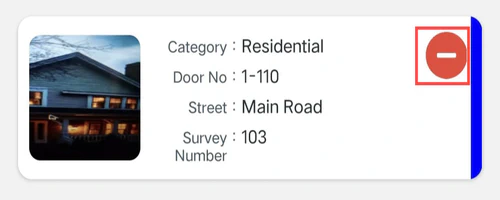
- From Create a House Screen, If you want to Delete any particular (Buildings/Owners/Households) record, click on the minus " - " sign which is located on the top right corner of the record in the Create A House Screen.
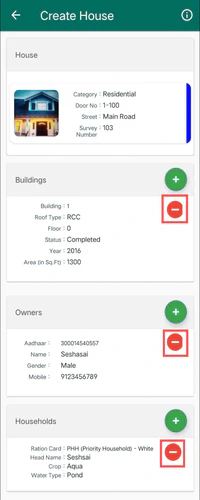
- After clicking on minus " - " sign, then a Dialogue Box displays as ” Are you sure you want to Delete ? “.
- Click ” Yes “ button, if you want to Delete the particular (Buildings/Owners/Households) Record.
- Click ” No “ button, if you don’t want to Delete the particular (Buildings/Owners/Households) Record.
- From List Screen, If you want to Delete the Total House Record, click on the minus " - " sign which is located on the top right corner of the record.
- After clicking on minus " - " sign, then a Dialogue Box displays as ” Are you sure you want to Delete ? “.
- Click ” Yes “ button, if you want to Delete the record.
- Click ” No “ button, if you don’t want to Delete the record.