Support Manager
Support Manager is a representative of the company responsible for managing the support team and overseeing the survey process to ensure its success.
The Admin will create a Support Manager’s account.
Persona of Support Manager
- Qualification : A Graduate with leadership qualities.
- Should create a supportive environment to track support team’s work.
- Should have fluency in english and hindi languages for effective communication.
- Need in-depth understanding of the product features to provide accurate guidance.
- Need to work in rotating shifts to ensure continuous coverage and efficient operations.
Responsibilities
- Responsible for Moving Survey status to inprogress upto mandal level.
- Responsible for Tracking the Survey Executive’s team.
- Responsible for Creating for panchayat secretary account.
- Responsible for Generating and sending Prodcut implementation Invoice to GOVT.
How to Login?
- Enter the sb.panchayatseva.com in the Web Browser (Click on the link).
- Click on the Sign In button located on the top right corner to access the Web Portal Login Screen, where the Support Team will provide the Field Inspector’s credentials.
- Enter the credentials in the Login Screen
which are notified to the Support Manager’s Mobile Number or Email ID.
- At the bottom left corner, you can find Contact Support, and if you click on this, it allows you to contact the Support Team for any login-related issues.
- At the bottom right corner, you can find Forgot Password, and if you click on this, it allows you to reset the password.
- Enter the SMS OTP and Email OTP that is notified to the registered Mobile number.
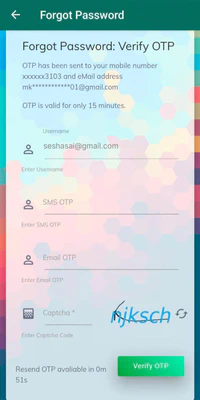
- Enter the SMS OTP and Email OTP that is notified to the registered Mobile number.
- Enter the Captcha and check the Captcha matches.
You need to enter the OTP before it expires.
- If the OTP expires, Resend OTP button will be displayed.
- Click on Resend OTP button to resend the OTP again.
- Click on Verify OTP button, it moves to the next screen to set a New Password.
- Enter the new Password.
Password must have more than 8 characters with a combination of uppercase, lowercase, numbers & special characters *!@#$%^&+=.
- Re-enter the Password in the Confirm Password field to verify it.
- Ensure the Password given in the Password & Confirm Password Fields are the same.
- After Confirmation of your password, enter the captcha and check that the captcha matches.
- Click on the Update button to update your new password and you will be moved to the next screen.
- The Screen displays as Your Password has been updated successfully and Click Here To Login button.

- Click the Click Here To Login button to Login again.
The screen will proceed to the next step only if the Username entered is correct.
- Once you log in, you will be redirected to the Support Manager Dashboard screen.
Title Section
On the left side of the screen, A side menu will be visible, where the work related to the Support Manager will be visible.
At the top right corner, you can view the following buttons.
- Maximize button : To view the full screen.
- Help : For any help, please contact us.
- Notifications : To view the count of the latest notifications.
- Profile : Survey Manager’s Name and Email Id, Organization, Build Version, Logout options will be visible.
Location Section
In the Location section, select the Divison, District, Mandal, and Panchayat.
Dashboard Section
- You can view the Survey Executive registration, exam, and activation status, as well as the Survey status and the number of taxable properties surveyed.
- Refresh Icon : It is located at the top right corner and if you click on this Refresh icon, it allows you to refresh the Summary Dashboard.
Data Preparation
- Collect and confirm hierarchical data (District, Division, Mandal, Panchayat, Village) to ensure accurate reflection in the Panchayat Seva system.
- Collect and record the best mobile network available in the assigned Panchayat.
- Collect approximate target asset counts for the survey.
- Confirm all collected data, including network details and asset counts, with the Panchayat Secretary.
Survey Progress and Monitoring
- Update the survey status to “In Progress” up to the Mandal level and monitor the performance of the survey executive team.
- Create and provide access to the Panchayat Secretary account for survey monitoring and approvals.
- Educate Support Executives on their responsibilities and tasks, assisting with handling challenging situations to ensure customer satisfaction.
- Manage Regional and Central Customer Care Centers effectively to address inquiries and resolve issues related to the survey process promptly.
Financial Management
- Generate and send the Product Implementation Invoice to the government for approval.
Create Organization
On the List Screen, click on Create button and then it moves to the Create Screen.
You must fill all the Mandatory fields (*) on the Create screen.
Ensure that the appropriate location is selected in the header for creating Division, Mandal, or Panchayat.
- Navigate to the Web App, go to the side menu, and select Product Settings > Organizations.
- On the Organizations screen, you can view all existing organizations or create a new one.
Instructions to Create a District
-
Ensure no location is selected in the top header.
-
Click the Create button.
-
Fill in the following details:
-
Choose the Organization Type:
Select District from the dropdown (Mandatory field). -
Enter the Sequence Number: (Mandatory field).
- Allowed Characters: 0-9
- Minimum Length: 2
- Maximum Length: 2
-
Enter the Name: (Mandatory field).
- Allowed Characters: A-Z a-z 0-9 space _ - .
- Minimum Length: 3
- Maximum Length: 64
-
Enter the Organization Code: (Mandatory field).
- Allowed Characters: A-Z a-z 0-9 space _ -
- Minimum Length: 2
- Maximum Length: 6
-
Enter the Latitude: (Mandatory field).
- Format: xx.xxxxxxxx
- Allowed Characters: 0-9 .
-
Enter the Longitude: (Mandatory field).
- Format: xx.xxxxxxxx
- Allowed Characters: 0-9 .
-
Enter the Email Address: (Mandatory field).
- Allowed Characters: A-Z a-z 0-9 @ . _
- Minimum Length: 3
- Maximum Length: 64
-
Enter the Map Place ID: (Mandatory field).
- Length: 27
-
Enter the Landline Number: (Optional field).
- Allowed Characters: 0-9 - space
-
Enter the Mobile Number: (Mandatory field).
- Allowed Characters: 0-9
- Length: 10
-
Enter the Pincode: (Mandatory field).
- Allowed Characters: 0-9
- Length: 6
-
Enter the Post Office Name: (Mandatory field).
- Allowed Characters: A-Z a-z 0-9 / : _ - . ,
- Minimum Length: 3
- Maximum Length: 128
-
Enter the Planned Survey Start Date: (Optional field).
- Format: dd-MM-YYYY
-
Enter the Planned Survey End Date: (Optional field).
- Format: dd-MM-YYYY
-
-
Once all required fields are filled, click the Submit button to move to the List Screen.
Instructions to Create a Division
- Select the appropriate District in the location dropdown at the top header.
- Click the Create button.
- Fill in the same details as District creation, but choose Division as the Organization Type.
- Once all required fields are filled, click the Submit button to move to the List Screen.
Instructions to Create a Mandal
- Select the appropriate District and Division in the location dropdown at the top header.
- Click the Create button.
- Fill in the same details as Division creation, but choose Mandal as the Organization Type.
- Once all required fields are filled, click the Submit button to move to the List Screen.
Instructions to Create a Panchayat
-
Select the appropriate District, Division, and Mandal in the location dropdown at the top header.
-
Click the Create button.
-
Fill in the following details:
-
Choose the Organization Type:
Select Panchayat from the dropdown (Mandatory field). -
Enter the Sequence Number: (Mandatory field).
- Allowed Characters: 0-9
- Length: 2
-
Enter the Name: (Mandatory field).
- Allowed Characters: A-Z a-z 0-9 space _ - .
- Minimum Length: 3
- Maximum Length: 64
-
Enter the Organization Code: (Mandatory field).
- Allowed Characters: A-Z a-z 0-9 space _ -
- Minimum Length: 2
- Maximum Length: 6
-
Enter the Latitude: (Mandatory field).
- Format: xx.xxxxxxxx
- Allowed Characters: 0-9 .
-
Enter the Longitude: (Mandatory field).
- Format: xx.xxxxxxxx
- Allowed Characters: 0-9 .
-
Enter the Email Address: (Mandatory field).
- Allowed Characters: A-Z a-z 0-9 @ . _
- Minimum Length: 3
- Maximum Length: 64
-
Enter the Map Place ID: (Mandatory field).
- Length: 27
-
Enter the Landline Number: (Optional field).
- Allowed Characters: 0-9 - space
-
Enter the Mobile Number: (Mandatory field).
- Allowed Characters: 0-9
- Length: 10
-
Enter the Pincode: (Mandatory field).
- Allowed Characters: 0-9
- Length: 6
-
Enter the Post Office Name: (Mandatory field).
- Allowed Characters: A-Z a-z 0-9 / : _ - . ,
- Minimum Length: 3
- Maximum Length: 128
-
Enter the Planned Survey Start Date: (Optional field).
- Format: dd-MM-YYYY
-
Enter the Planned Survey End Date: (Optional field).
- Format: dd-MM-YYYY
-
-
Once all required fields are filled, click the Submit button to move to the List Screen.
Update Organization
On the List Screen, click on Update button and then it moves to the Update Screen.
- Select the Organization to update.
- Modify the required fields (e.g., Name, Email Address).
- Click Submit to save changes.
View Organization
On the List Screen, click the View button and then it moves to the View Screen.
- You can view details of the selected Organization.
Export Organization
On the List Screen, click the Export button to download an Excel sheet containing the organization data.