Support Executive
Support Executives are customer service representatives, and their primary role is to address user queries and resolve issues efficiently.
Persona of Support Executive
- Qualification : A Graduate with managing customer calls or queries efficiently.
- Maintaining a positive environment for customers to seek assistance.
- Should have a Strong knowledge of product features to address queries effectively.
- Should have fluency in English and Hindi for communication.
- Should able to work in rotating shifts to provide 24/7 support.
Responsibilities
- Responsible for Handling Queries and Concerns.
- Responsible for Resolving Issues.
- Responsible for Ticket Workflow Management.
How to Login?
- Enter the sb.panchayatseva.com in the Web Browser (Click on the link).
- Click on the Sign In button located on the top right corner to access the Web Portal Login Screen, where the Support Team will provide the Field Inspector’s credentials.
- Enter the credentials in the Login Screen
which are notified to the Support Executive’s Mobile Number or Email ID.
- At the bottom left corner, you can find Contact Support, and if you click on this, it allows you to contact the Support Team for any login-related issues.
- At the bottom right corner, you can find Forgot Password, and if you click on this, it allows you to reset the password.
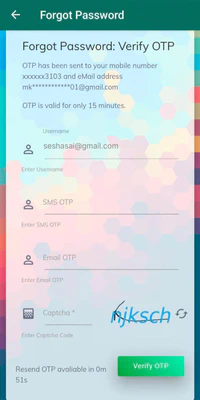
- Enter the SMS OTP and Email OTP that is notified to the registered Mobile number.
- Enter the SMS OTP and Email OTP that is notified to the registered Mobile number.
- Enter the Captcha and check the Captcha matches.
You need to enter the OTP before it expires.
- If the OTP expires, Resend OTP button will be displayed.
- Click on Resend OTP button to resend the OTP again.
- Click on Verify OTP button, it moves to the next screen to set a New Password.
- Enter the new Password.
Password must have more than 8 characters with a combination of uppercase, lowercase, numbers & special characters *!@#$%^&+=.
- Re-enter the Password in the Confirm Password field to verify it.
- Ensure the Password given in the Password & Confirm Password Fields are the same.
- After Confirmation of your password, enter the captcha and check that the captcha matches.
- Click on the Update button to update your new password and you will be moved to the next screen.
- The Screen displays as Your Password has been updated successfully and Click Here To Login button.
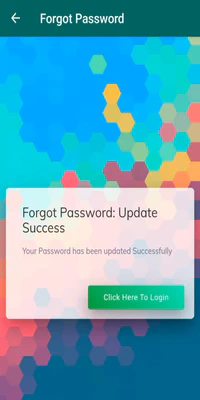
- Click the Click Here To Login button to Login again.
The screen will proceed to the next step only if the Username entered is correct.
- Once you log in, you will be redirected to the Support Executive Dashboard screen.
Location Section
In the Location section, It is mandatory to select the Divison, District, Mandal, and Panchayat.
Dashboard Section
- The Support Executive can view only the following dashboards.
- Taxable Properties: To View property tax-related information.
- Property Inspection: To View generated data and inspection reports.
- Citizen: To View citizen-related information.
- Panchayat Asset: To View Panchayat asset information.
- GIS Maps: To View geographical information system maps.
- Grievances: To View citizen grievances.
- Govt Schemes: To View government schemes.
- Govt Orders & Circulars: To View government orders and circulars.
- Administration: To Manage the Financial Records.
- Product Settings: To Manage the Users and to view the Organizations.
- Asset Survey: To Manage the Survey Executives and Survey Companies.
- Once you Login, you will be moved to the Summary Dashboard screen.
Summary Dashboard
Navigation
- Look for the Dashboard option in the side menu on the left side of the screen, and then find the Summary Dashboard and by clicking on it will take you to the Summary Dashboard screen.
Details Section
- Refresh Icon : It is located at the top right corner and if you click on this Refresh icon, it allows you to refresh the Summary Dashboard.
- The progress of individual properties surveyed, the active status of Survey executives, and the count of properties surveyed, with widgets for Today, This Week, This Month, and Total Properties surveyed will be visible.
Support
You can view the toll-free numbers of customer care to report any issues.
Navigation
- Look for the Support option in the side menu on the left side of the screen.
You can view the following options under the Support category in the side menu :
- Customer Care: To contact the Support Team for any assistance.
- Help: For any assistance, please contact us.
- Product Features: You can view the product features.
- Support Ticket : Handling the End user’s Issues by creating support Tickets.
Creation of a Support Ticket
Support Executives should create support tickets for any issues raised by Users.
It is Mandatory to create Ticket Category before creating a Support Ticket.
Navigation
- Look for the Support option in the side menu on the left side of the screen, and then find the Support Ticket and by clicking on it will take you to the Support Ticket screen.
Create
On the List Screen, click on Create button to move to the Create Screen.
Fill all the Mandatory fields (*) on the Create screen.
- Enter the Title (Mandatory field).
- Allowed Characters: A-Z a-z 0-9
- Minimum Length: 6
- Maximum Length: 64
- Enter the Description (Mandatory field).
- Allowed Characters: # A-Z a-z 0-9
- Minimum Length: 6
- Maximum Length: 256
- Choose the appropriate Category from the Dropdown (Mandatory field).
- Choose the appropriate Status from the Dropdown (Mandatory field).
- Choose the appropriate Priority from the Dropdown (Mandatory field).
- Attach the files in the Attachment field (Mandatory field).
- Fill the non-mandatory fields :
- Docket ID
- Mobile Number: Enter the Mobile Number which is registered to the Application and click on validate button to get the details such as Name, Aadhaar, Email, and Designation from the system.
- Enter the Captcha displayed on the screen.
- At the bottom right corner, you can find Back Icon and if you click on this it moves back to the Support Ticket screen.
- Once all required fields are filled, click the Submit button and then it moves to the Support Ticket Screen.
- After successful creation of the Support Ticket, a message will be displayed at the top of the screen as " A Support TicketObj Successfully Updated."
- If the Support Ticket creation fails, a message will be displayed at the top of the screen as " Failed to Process the Request “.
Update
On the Support Ticket Screen, select the checkbox that you want to update and click the Update button and then it moves to the Update Screen.
- If no checkbox is selected, then an Alert Box is displayed as ” Please Select one item to Update" and click OK button on the Alert Box to select the checkbox.
- Modify the fields that you want to edit.
- Enter the Reason for Updation.
- Enter the Captcha displayed on the screen.
- At the bottom right corner, you can find Back Icon and if you click on this it moves back to the Support Ticket screen.
- Once all required fields are filled, click the Submit button and then it moves to the Support Ticket screen.
- After successful updation of the Support Ticket, a message will be displayed at the top of the screen as " A Support Ticket Successfully Updated."
- If the Support Ticket updation fails, a message will be displayed at the top of the screen as " Failed to Process the Request “.
View
On the Support Ticket Screen, select the checkbox that you want to view and click the View button and then it moves to the View Screen.
- If no checkbox is selected, then an Alert Box is displayed as ” Please Select one item to View" and click OK button on the Alert Box to select the checkbox.
In the View section, the PDF and Excel buttons allow you to download the details of the respective Support Ticket.
- You can view the selected Support Ticket details.
- At the bottom right corner, you can find Back Icon and if you click on this then it moves back to the Support Ticket Screen.
Export
On the Support Ticket Screen, select the checkboxes that you want to export.
- If no checkbox is selected, then an Alert Box is displayed as " Please Select atleast one checkbox to perform export PDF or Excel operation" and click OK button on the Alert Box to select the checkbox.
In the Export section, you can download details of multiple Support Tickets at once in PDF or Excel format by selecting them.
- Click the Export button, and then PDF and Excel options will be displayed.
- Select PDF Option to export the selected Support Ticket details in PDF format.
- Select Excel Option to export the selected Support Ticket details in Excel sheet.
Notifications Section
- Receive updates about new or escalated tickets.
- Notifications appear as a count in the top-right corner.
User Account
A User Account is a personalized profile that allows users to manage and secure their information.
Navigation
- Look for the User Account option in the side menu on the left side of the screen. You can view the following options under the User Account category in the side menu:
- My Account: To update the Support Executive’s account details.
- Change Password: To update the Support Executive’s account password.
- Profile Picture: To update the Support Executive’s profile picture.
- Login Pin: To update the Support Executive’s login pin.
Support
You can view the toll-free numbers of customer care to report any issues.
Navigation
- Look for the Support option in the side menu on the left side of the screen. You can view the following options under the Support category in the side menu:
- Customer Care: To contact the Support Team for any assistance.
- Help: For any assistance, please contact us.
- Product Features: You can view the product features.