Field Inspector
The Field Inspector is responsible for validating a random number of taxable properties within the Panchayat to ensure the accuracy of the survey. Additionally, the Field Inspecctor plays a key role in managing corrections and assisting in the absence of the Panchayat Secretary.
The Support Team will create the Field Inspector’s account.
Persona
- Qualification: A Graduate residing in the native place.
- Should create a supportive environment with the Panchayat Secretary to make operations smoother.
- Should have basic knowledge of device and incident management tools.
- Should have strong regional communication skills with professional attire.
- Must communicate well with the Panchayat Secretary and local people.
Responsibilities
- Responsible for managing the property inspection process, including generating random property selections, downloading property data for verification, and updating inspection data with approval/rejection statuses.
- Responsible for collecting Panchayat devices and printed survey data, then handing them over to the Panchayat Secretary.
- Responsible for updating the Device Incident Status to “Device Delivered.”
- Correction of Surveyed Data: Responsible for updating surveyed data if the citizen requests changes.
- In the absence of the Panchayat Secretary:
- Perform all operations except financial transactions.
- Act as the primary person for making corrections to the surveyed data.
How to Login?
- Enter the sb.panchayatseva.com in the Web Browser (Click on the link).
- Click on the Sign In button located on the top right corner to access the Web Portal Login Screen, where the Support Team will provide the Field Inspector’s credentials.
- Enter the credentials in the Login Screen
which are notified to the Field Inspector’s Mobile Number or Email ID.
- At the bottom left corner, you can find Contact Support, and if you click on this, it allows you to contact the Support Team for any login-related issues.
- At the bottom right corner, you can find Forgot Password, and if you click on this, it allows you to reset the password.
- Enter the SMS OTP and Email OTP that is notified to the registered Mobile number.
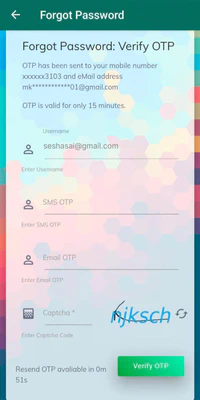
- Enter the SMS OTP and Email OTP that is notified to the registered Mobile number.
- Enter the Captcha and check the Captcha matches.
You need to enter the OTP before it expires.
- If the OTP expires, Resend OTP button will be displayed.
- Click on Resend OTP button to resend the OTP again.
- Click on Verify OTP button, it moves to the next screen to set a New Password.
- Enter the new Password.
Password must have more than 8 characters with a combination of uppercase, lowercase, numbers & special characters *!@#$%^&+=.
- Re-enter the Password in the Confirm Password field to verify it.
- Ensure the Password given in the Password & Confirm Password Fields are the same.
- After Confirmation of your password, enter the captcha and check that the captcha matches.
- Click on the Update button to update your new password and you will be moved to the next screen.
- The Screen displays as Your Password has been updated successfully and Click Here To Login button.

- Click the Click Here To Login button to Login again.
The screen will proceed to the next step only if the Username entered is correct.
- Once you log in, you will be redirected to the Field Inspector Dashboard screen.
Location Section
In the Location section, select the Division, District, Mandal, and Panchayat.
Dashboard Section
Field Inspector can view the Summary Dashboard , Property Dashboard , and Survey Dashboard .
Summary Dashboard
Navigation
- Look for the Dashboard option in the side menu on the left side of the screen.
- Click on the Summary tab within the Dashboard.
Details Section
- Refresh Icon: Located at the top right corner, clicking this icon refreshes the Summary Dashboard.
- The Summary Dashboard provides an overview of key metrics related to property inspections, such as:
- Total number of properties inspected.
- Number of properties inspected today, this week, and this month.
- Percentage of inspections completed.
- Number of active and inactive inspectors.
- And other relevant summary statistics.
Property Dashboard
Navigation
- Look for the Dashboard option in the side menu on the left side of the screen.
- Click on the Property tab within the Dashboard.
Details Section
- Refresh Icon: Located at the top right corner, clicking this icon refreshes the Property Dashboard.
- The Property Dashboard provides insights into the status of property inspections:
- Number of properties scheduled for inspection.
- Number of properties inspected and awaiting verification.
- Number of properties approved or rejected.
- Distribution of properties by inspection status (e.g., scheduled, in progress, completed).
- And other relevant property-specific metrics.
Survey Dashboard
Navigation
- Look for the Dashboard option in the side menu on the left side of the screen.
- Click on the Survey tab within the Dashboard.
Details Section
- Refresh Icon: Located at the top right corner, clicking this icon refreshes the Survey Dashboard.
- The Survey Dashboard provides an overview of survey activities:
- Number of surveys conducted.
- Number of surveys completed.
- Survey completion rate.
- Distribution of survey responses.
- And other relevant survey-related metrics.
Property Inspection Process
The Field Inspector validates random properties from the surveyed data to ensure the survey’s accuracy.
Navigation
- Look for the Property Inspection option in the side menu on the left side of the screen.
- Click on the Inspect Data category will be displayed within the Property Inspection section.
- The Generate Properties option.
- Click on the Generate Properties category.
- You will be taken to the Property Generation Screen.
GIS Maps
- Look for the GIS Maps option in the side menu on the left side of the screen, and then find the Taxable Properties within the GIS Maps; clicking on it will take you to the Property Geo Map screen.
- You can view the location of taxable properties, Select the checkbox next to a property name to view its location on the map.
- Look for the Panchayat Asset within the GIS Maps; clicking on it will take you to the Asset Geo Map screen.
- You can view the location of Panchayat Asset, Select the checkbox next to a property name to view its location on the map.
- Look for the Panchayat Device option in the side menu on the left side of the screen, and then find the Device Incident within the Panchayat Device; clicking on it will take you to the Device Incident Screen.
Generate Random Properties
Survey data for inspection can only be generated if the Panchayat survey is fully completed and the survey status is in the “Survey Completed” state.
The generated properties will be based on the total properties surveyed within the Panchayat.
- Select the Panchayat for which random properties need to be generated.
- Enter the number of properties to generate and click on the Generate button.
- The random properties will be displayed on the screen for validation.
Verify Properties
- Review each property displayed for verification purposes.
- Cross-check the property details of the printed survey data.
- Update the Inspection Status as Approved or Rejected for each property.
- At the bottom right corner, you can find the Back button, which navigates back to the Property Inspection Screen.
- If everything is fine after verifying the properties, submit the data and ensure the device is in working condition before handing it to the Panchayat Secretary.
- Once all required fields are updated, click the Submit button.
- A message will be displayed at the top of the screen as Properties Successfully Verified.
Data Verification
- Review and verify the accuracy of surveyed data.
- Correction of Surveyed Data: Responsible for updating surveyed data if the citizen requests changes.
Support in Panchayat Operations:**
- In the absence of the Panchayat Secretary:
- Perform all operations except financial transactions.
- Act as the primary person for making corrections to the surveyed data.
User Account
A User Account is a personalized profile that allows users to manage and secure their information.
Navigation
- Look for the User Account option in the side menu on the left side of the screen. You can view the following options under the User Account category in the side menu:
- My Account: To update the Field Inspector’s account details.
- Change Password: To update the Field Inspector’s account password.
- Profile Picture: To update the Field Inspector’s profile picture.
- Login Pin: To update the Field Inspector’s login pin.
Support
You can view the toll-free numbers of customer care to report any issues.
Navigation
- Look for the Support option in the side menu on the left side of the screen. You can view the following options under the Support category in the side menu :
- Customer Care: To contact the Support Team for any assistance.
- Help: For any assistance, please contact us.
- Product Features: You can view the product features.