Device Manager
A Device Manager is responsible for managing device collection, registering, and assigning devices to the panchayats.
Persona
- Qualification : A Graduate with decent knowledge on Electronic Gadgets.
- Maintaining a positive environment for managing devices by tracking, assigning, and incident management of devices.
- Capable of handling device Incidents within SLA(Service level Agreement), following to organzational timelines.
- Should have fluency in English for communication.
- Should have an understanding of devices and SIM cards, along with basic knowledge of incident handling.
Responsibilities
- Responsible for Collecting Device, SIM & updating stock.
- Responsible for Registering a device and sim into system.
- Responsible for Allocating devices and preparing them for dispatch to the Panchayat.
- Responsible for Updating system generated incident with shipment info.
How to Login?
- Enter the sb.panchayatseva.com in the Web Browser (Click on the link).
- Click on the Sign In button located on the top right corner to access the Web Portal Login Screen, where the Support Team will provide the Field Inspector’s credentials.
- Enter the credentials in the Login Screen
which are notified to the Device Manager’s Mobile Number or Email ID.
- At the bottom left corner, you can find Contact Support, and if you click on this, it allows you to contact the Support Team for any login-related issues.
- At the bottom right corner, you can find Forgot Password, and if you click on this, it allows you to reset the password.
- Enter the SMS OTP and Email OTP that is notified to the registered Mobile number.
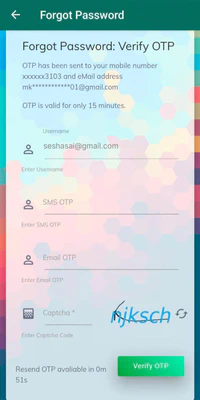
- Enter the SMS OTP and Email OTP that is notified to the registered Mobile number.
- Enter the Captcha and check the Captcha matches.
You need to enter the OTP before it expires.
- If the OTP expires, Resend OTP button will be displayed.
- Click on Resend OTP button to resend the OTP again.
- Click on Verify OTP button, it moves to the next screen to set a New Password.
- Enter the new Password.
Password must have more than 8 characters with a combination of uppercase, lowercase, numbers & special characters *!@#$%^&+=.
- Re-enter the Password in the Confirm Password field to verify it.
- Ensure the Password given in the Password & Confirm Password Fields are the same.
- After Confirmation of your password, enter the captcha and check that the captcha matches.
- Click on the Update button to update your new password and you will be moved to the next screen.
- The Screen displays as Your Password has been updated successfully and Click Here To Login button.

- Click the Click Here To Login button to Login again.
The screen will proceed to the next step only if the Username entered is correct.
- Once you log in, you will be redirected to the Device Manager Dashboard screen.
Location Section
In the Location section, Select the District, Divison, Mandal, and Panchayat.
Dashboard Section
Device Manager can view the Summary and Survey Dashboards.
- Once you Login, you will be moved to the Summary Dashboard screen.
Summary Dashboard
Navigation
- Look for the Dashboard option in the side menu on the left side of the screen, and then find the Summary Dashboard and by clicking on it will take you to the Summary Dashboard screen.
Details Section
- Refresh Icon : It is located at the top right corner and if you click on this Refresh Icon, it allows you to Refresh the Summary Dashboard.
- The progress of individual properties surveyed, the active status of Survey executives, and the count of properties surveyed, with widgets for Today, This Week, This Month, and Total Properties surveyed will be visible.
Survey Dashboard
Navigation
- Look for the Dashboard option in the side menu on the left side of the screen, and then find the Survey Dashboard and by clicking on it will take you to the Survey Dashboard screen.
Details Section
- Refresh Icon : It is located at the top right corner and if you click on this Refresh Icon, it allows you to Refresh the Survey Dashboard.
- The Survey Status, along with today’s count and the total count of individually surveyed taxable properties will be visible.
Updating the Stock - Device Inventory
The Device Manager should first purchase the Devices and Sim Cards.
Navigation
- Look for the Panchayat Device option in the side menu on the left side of the screen, and then find the Device Inventory and by clicking on it will take you to the Device Inventory screen.
Details Section
- Search Icon : It is located at the top right corner and if you click on this Search icon, it allows you to search for the devices.
Create
On the Device Inventory Screen, click on Create button and then it moves to the Create Screen.
Fill all the Mandatory fields(*) on the Create screen.
-
Enter the Device Serial Number (Mandatory field).
- Allowed Characters A-Z a-z 0-9
- Minimum Length 3
- Maximum Length 36
- Allowed Characters A-Z a-z 0-9
-
After entering the Device Serial Number, click on Add button to add the Device to the Stock.
-
Entering a Serial Number that has already been added to the list will display an Alert Box as “Duplicate Serial No” and click OK to add the Serial number.
-
Adding an existing Serial Number to the list will display a message at the top of the screen as " Devices with Serial Numbers already exists".
-
Adding an Invalid Serial Number to the list will display a message at the top of the screen as " Invalid Device Serial Number “.
-
Then, Enter the Captcha displayed on the screen (Mandatory field).
-
At the bottom right corner, you can find Back button and if you click on this button and then it moves back to the Device Inventory Screen.
-
Once all required fields are filled, click on the Submit button and then it moves to the Device Inventory Screen.
- After Successful Creation of the device, A message will be displayed at the top of the screen as " A Device Inventory Successfully Created “.
- If the device creation fails, a message will be displayed at the top of the screen as " Failed to Process the Request “.
-
The Status of the device will be shown as MDM Pending.
-
After Sometime, the Status of the device will automatically changes to Stock.
Update
On the Device Inventory Screen, select the checkbox that you want to update and click the Update button and then it moves to the Update Screen.
- If you click on the Update button without selecting any checkbox, then an Alert Box is displayed as ” Please Select one record to Update” and click OK button on the Alert Box to select the checkbox.
- Can update only the Purchase Date, End Of Life, Status, and Vendor.
- The Device Serial Number, IMEI Number and BMC Id fields of the mobile have been added in a readable format.(Mandatory field).
Readable fields cannot be edited. Remaining fields can be edited.
- Modify the fields that you want to edit.
- Note the Reason for Update (Mandatory field).
- Enter the Captcha displayed on the screen.
- At the bottom right corner, you can find Back button and if you click on this and then it moves back to the Device Inventory Screen.
- Once all required fields are filled, click the Submit button and then it moves to the Device Inventory Screen.
- After Successful updation of the device, A message will be displayed at the top of the screen as " A Device Inventory Successfully Updated”.
- If the device updation fails, a message will be displayed at the top of the screen as " Failed to Process the Request “.
View
On the Device Inventory Screen, select the checkbox that you want to view and click the View button and then it moves to the View screen.
- If you click on the View button without selecting any checkbox, then an Alert Box is displayed as ” Please Select one record to View" and click OK button on the Alert Box to select the checkbox.
In the View section, the PDF and Excel buttons allow you to download the details of the respective company.
- Device inventory details are visible.
- Click on the Back button, it moves to the Device Inventory Screen.
Export
On the Device Inventory Screen, select the checkboxes that you want to Export and click the Export button, and then PDF and Excel options will be displayed.
- If you click on the PDF or Excel button placed under the Export button without selecting any checkboxes, an alert box will be displayed :
PDF : Please select at least one record to perform the Export PDF operation. Excel : Please select at least one record to perform the Export Excel operation.In the Export section, you can share details of multiple device details at once in PDF or Excel format by selecting the checkboxes.
- Click the Export button, and then PDF and Excel options will be displayed.
- Select PDF Option to Export the selected Device Inventory details in PDF format.
- Select Excel Option to Export the selected Device Inventory details in Excel sheet.
Registering Sim into the device - SIM Inventory
SIM Inventory is a system that keeps a record of all Sim cards.It stores key information such as the Sim card number, the mobile network provider, and the status of the Sim User.
Navigation
- Look for the Panchayat Device option in the side menu on the left side of the screen, and then find the SIM Inventory and by clicking on it will take you to the SIM Inventory screen.
Details Section
- Search Icon : It is located at the top right corner and if you click on this Search icon, it allows you to search for the devices.
Create
On the SIM Inventory Screen, click on Create button and then it moves to the Create Screen.
Fill all the Mandatory fields(*) on the Create screen.
- Choose the Sim Provider from the dropdown (Mandatory field).
- Enter the Mobile Number (Mandatory field).
- Allowed Characters 0-9
- Length 10
- Allowed Characters 0-9
- Enter the Sim Id (Mandatory field).
- Allowed Characters 0-9
- Length 15
- Allowed Characters 0-9
- Enter the Package (Mandatory field).
- Allowed Characters A-Z a-z 0-9
- Minimum Length
- Maximum Length 64
- Allowed Characters A-Z a-z 0-9
- Select the Purchase Date from the calendar and click OK button (Mandatory field).
- Select the Renewal Date from the calendar and click OK button (Mandatory field).
- Select the End of Life from the calendar and click OK button (Mandatory field).
- Choose the Sim Status from the dropdown (Mandatory field).
- Enter the Captcha displayed on the screen (Mandatory field).
- Once all required fields are filled, click the Submit button and then it moves to the Device Inventory Screen.
- After Successful Creation of the SIM , A message will be displayed at the top of the screen as " A SIM Inventory Successfully Created."
- If the SIM creation fails, a message will be displayed at the top of the screen: " Failed to Process the Request “.
Import
On the SIM Inventory Screen, click on the Import button and then it moves to the Import screen.
Avoid Selecting the checkbox to Import the Sim Inventory Details.
If any check box is selected to Import the Sim Inventory Details, then an Alert Box will displays a message as " You cannot perform import Operation on selected record. Please dont select any of the items and try again" and click OK button on the Alert Box to unselect the checkbox.
Fill all the Mandatory fields(*) on the Import screen.
- Click on the Download Sample CSV to download and view the sample file of Sim Inventory Data.
- Click on the Choose File to add the excel sheet of Sim Inventory Data prepared by Device Manager.
Only CSV Files are allowed .
- Enter the Captcha displayed on the screen (Mandatory field).
- After Entering the Captcha, click on the Submit button and then it moves to the Import CSV Data Screen.
- Check the Data which is added in the Excel sheet will be visible in the Import CSV Data Screen.
- Enter the Captcha displayed on the screen (Mandatory field).
- Click on the Back button, it moves back to the SIM Inventory Screen. Device.
- Once all required fields are filled, click the Submit button and then it moves to the SIM Inventory Screen.
- After Importing the data Successfully, A message will be displayed at the top of the screen as " A SIM Inventory Successfully Imported.”
- If importing the Sim Inventory details fails, a message will be displayed at the top of the screen as " Failed to Process the Request “.
Update
On the SIM Inventory Screen, select the checkbox that you want to Update and click the Update button and then it moves to the Update screen.
- If you click on the Update button without selecting any checkbox, then an Alert Box is displayed as ” Please Select one record to Update" and click OK button on the Alert Box to select the checkbox.
Readable fields cannot be edited. Remaining fields can be edited.
- Modify the fields that you want to edit.
- You should note the Reason for Update.
- Enter the Captcha displayed on the screen.
- Click on the Back button, it moves back to the SIM Inventory Screen.
- After Entering the Captcha, click the Submit button, it will move to the SIM Inventory Screen.
- After Successful updation of the SIM, A message will be displayed at the top of the screen as " A SIM Inventory Successfully Updated."
- If the Sim updation fails, a message will be displayed at the top of the screen as " Failed to Process the Request “.
View
On the SIM Inventory Screen, select the checkbox that you want to View and click the View button and then it moves to the View screen.
- If you click on the View button without selecting any checkbox, then an Alert Box is displayed as ” Please Select one record to View" and click OK button on the Alert Box to select the checkbox.
In the View section, the PDF and Excel buttons allow you to download the details of the respective company.
- You can view the respective SIM inventory details.
- Click on the Back button, it moves back to the SIM Inventory Screen.
Export
On the SIM Inventory Screen, select the checkboxes that you want to Export and click the Export button, and then PDF and Excel options will be displayed.
- If you click on the PDF or Excel button placed under the Export button without selecting any checkboxes, an alert box will be displayed :
PDF : Please select at least one record to perform the Export PDF operation. Excel : Please select at least one record to perform the Export Excel operation.In the Export section, you can share details of multiple device details at once in PDF or Excel format by selecting the checkboxes.
- You can Export the SIM Inventory details in PDF format or in an Excel sheet.
- Select PDF Option to Export the selected SIM Inventory details in PDF format.
- Select Excel Option to Export the selected SIM Inventory details in Excel sheet.
Allocating Devices to Panchayat - Panchayat Device
Assigning the Registered Device to a Panchayat.
Navigation
- Look for the Panchayat Device option in the side menu on the left side of the screen, and then find the Panchayat Device and by clicking on it will take you to the Panchayat Device screen.
Details Section
- Search Icon : It is located at the top right corner and if you click on this Search icon, it allows you to search for the devices.
Selecting a Panchayat is mandatory to assign a device to a Panchayat.
If the Panchayat is not selected, A Dialogue Box will display to select the District, Divison, Mandal, Panchayat and click on Submit button to assign the device to the selected Panchayat. - The Survey Status of the selected Panchayat should be in Completed State.
- If the Survey Status of the panchayat is not in Completed state then a message will be displayed at the top of the screen as “Panchayat Survey Status should be in Complete State”.
- Click the checkbox that you want to Assign it to a panchayat.
- If you click on the Assign button without selecting any checkbox, then an Alert Box is displayed as " Please Select one record to Assign" and click OK button on the Alert Box to select the checkbox.
- If the Device is already assigned to a panchayat then a message will be displayed at the top of the screen as " A Device is already assigned to a Panchayat" .
Assign
On the Panchayat Device Screen, select the checkbox that you want to Assign and click on Assign button and then it moves to the Assign Screen.
Fill all the Mandatory fields(*) on the Create screen.
- Panchayat Name, Panchayat Secratary Name, Device, Sim-Mobile Number are visible on the Screen.
- Enter the Address of the Panchayat (Mandatory field).
- Allowed Characters A-Z a-z 0-9 space
- Minimum Length 3
- Maximum Length 64
- Allowed Characters A-Z a-z 0-9 space
- Enter the Captcha displayed on the screen.
- After entering the Captcha, click the Submit button, it will move to the Panchayat Device Screen.
- After Successful assignment of the Panchayat Device, A message will be displayed at the top of the screen as " A Panchayat Device Successfully created."
- If the Panchayat Device assignment fails, a message will be displayed at the top of the screen as " Failed to Process the Request “.
- The Status of the device will be shown as Prepared to Transit.
- When the Device is taken by Field Inspector, the Status of the device will automatically changes to Transit to Panchayat.
Update
On the Panchayat Device Screen, select the checkbox that you want to update and click on Update button, and then it moves to the Update Screen.
- If you click on the Update button without selecting any checkbox, then an Alert Box is displayed as ” Please Select one record to Update" and click OK button on the Alert Box to select the checkbox.
- You can Update only the Device, Sim Card and Address.
Readable fields cannot be edited. Remaining fields can be edited.
- Modify the fields that you want to edit.
- You should note the Reason for Update.
- Enter the Captcha displayed on the screen.
- After entering the Captcha, click the Submit button, it will move to the Panchayat Device Screen.
- After Successful updation of the Panchayat Device, A message will be displayed at the top of the screen as " A Panchayat Device Successfully Updated."
- If the Panchayat Device updation fails, a message will be displayed at the top of the screen as " Failed to Process the Request “.
View
On the Panchayat Device Screen, select the checkbox that you want to view and click the View button and then it moves to the View Screen.
- If you click on the View button without selecting any checkbox, then an Alert Box is displayed as ” Please Select one record to View" and click OK button on the Alert Box to select the checkbox.
- You can view the Panchayat Device details.
In the View section, the PDF and Excel buttons allow you to share the details of the respective device.
- Click on the Back button, it moves back to the Panchayat Device Screen.
Export
On the Panchayat Device Screen, select the checkboxes that you want to Export and click the Export button, and then PDF and Excel options will be displayed.
- If you click on the PDF or Excel button placed under the Export button without selecting any checkboxes, an alert box will be displayed :
PDF : Please select at least one record to perform the Export PDF operation. Excel : Please select at least one record to perform the Export Excel operation.In the Export section, you can share details of multiple Panchayat Devices at once in PDF or Excel format by selecting the checkboxes.
- You can Export the Panchayat Device details in PDF format or in an Excel sheet.
- Select PDF Option to Export the selected Panchayat Device details in PDF format.
- Select Excel Option to Export the selected Panchayat Device details in Excel sheet.
Updating the system generated incident - Device Incident
You can contact the Device Manager if you encounter any issues with the device or the mobile you are using for the Survey.
Selecting a Panchayat is mandatory for device incident.
If the Panchayat is not selected, A Dialogue Box will display to select the Divison, District, Mandal, Panchayat and click on Submit button to select the Panchayat.
Navigation
- Look for the Panchayat Device option in the side menu on the left side of the screen, and then find the Device Incident and by clicking on it will take you to the Device Incident screen.
Details Section
-
Search Icon : It is located at the top right corner and if you click on this Search icon, it allows you to search for the devices. On the Device Incident Screen, click on Create button and then it moves to the Create Screen.
Fill all the Mandatory fields(*) on the Create screen.
-
Enter the Title of the Device Incident (Mandatory field).
- Allowed Characters A-Z a-z 0-9 space
- Minimum Length 3
- Maximum Length 64
- Allowed Characters A-Z a-z 0-9 space
-
Enter the Description (Mandatory field).
- Allowed Characters # A-Z a-z 0-9
- Minimum Length 3
- Maximum Length 64
- Allowed Characters # A-Z a-z 0-9
-
Choose the Appropriate Category from the Dropdown (Mandatory field).
-
Choose the Appropriate Priority from the Dropdown (Mandatory field).
-
Select the model of the Device (Mandatory field).
-
Choose the Appropriate Status from the Dropdown (Mandatory field).
-
Choose the Assignee from the Dropdown.
-
Enter the Reopened Date from the calendar.
-
Choose the Expected Due Date from the calendar.
-
Enter the Tracking Number which is received from the Courier Office.
- Allowed Characters _ . @ A-Z a-z 0-9
- Minimum Length 3
- Maximum Length 24
- Allowed Characters _ . @ A-Z a-z 0-9
-
Enter the Tracking URL which is received from the Courier Office.
- Allowed Characters space A-Z a-z 0-9
- Minimum Length 3
- Maximum Length 255
- Allowed Characters space A-Z a-z 0-9
-
Enter the Courier Service Name which is received from the Courier Office.
- Allowed Characters space A-Z a-z 0-9
- Minimum Length 3
- Maximum Length 64
- Allowed Characters space A-Z a-z 0-9
-
After entering the Courier Service Name, enter the Captcha displayed on the screen.
-
After entering the captcha, click the Submit button, it will move to the Device Incident Screen.
-
Once all required fields are filled, click the Submit button to move to the Device Incident Screen.
-
After Successful creation of the Device Incident, A message will be displayed at the top of the screen as " A Device Incident Successfully Created."
- If the Device Incident creation fails, a message will be displayed at the top of the screen as " Failed to Process the Request “.
Update
On the Device Incident Screen, select the checkbox that you to want to update and click on Update button and then it moves to the Update Screen.
- If you click on the Update button without selecting any checkbox, then an Alert Box is displayed as ” Please Select one record to Update" and click OK button on the Alert Box to select the checkbox.
- You can Update only the Status of the Incident, Expected due date, and Reopened Date.
Readable fields cannot be edited. Remaining fields can be edited.
- Modify the fields that you want to edit.
- You should note the Reason for Updation.
- Enter the Captcha displayed on the screen.
- After Entering the Captcha, click the Submit button, it will move to the Device Incident Screen.
- After Successful Updation of the Device Incident, A message will be displayed at the top of the screen as " A Device Incident Successfully Updated."
- If the Device Incident updation fails, a message will be displayed at the top of the screen as " Failed to Process the Request “.
View
On the List Screen, select the checkbox that you want to view and click the View button and then it moves to the View Screen.
- If you click on the View button without selecting any checkbox, then an Alert Box is displayed as ” Please Select one record to View" and click OK button on the Alert Box to select the checkbox.
- You can View your Device Incident details.
In the View section, the PDF and Excel buttons allow you to share the details of the respective device.
- Click on the Back button, it moves back to the Device Incident Screen.
Onsite Devices
To view the Panchayat Devices which are assigned to the Panchayat.
Navigation
- Look for the Product Settings option in the side menu on the left side of the screen, and then find the Onsite Devices and by clicking on it will take you to the Onsite Devices screen.
Details Section
- Search Icon : It is located at the top right corner and if you click on this Search icon, it allows you to search for the Onsite devices.
View
On the Onsite Devices Screen, select the checkbox that you want to view and click on the View button and then it moves to the View Screen.
- If you click on the View button without selecting any checkbox, then an Alert Box is displayed as " Please Select one record to View" and click OK button on the Alert Box to select the checkbox.
- Onsite Devices details are visible.
In the View section, the PDF and Excel buttons allow you to share the details of the respective Device.
- Click on the Back button, it moves back to the Onsite Devices Screen.
User Account
A User Account is a personalized profile that allows users to manage and secure their information.
Navigation
- Look for the User Account option in the side menu on the left side of the screen.
- You can view the following options under the User Account category in the side menu.
- My Account: To update the Device Manager’s account details.
- Change Password: To update the Device Manager’s account password.
- Profile Picture: To update the Device Manager’s profile picture.
Support
You can view the toll-free numbers of the Support Team to report the issues.
Navigation
- Look for the Support option in the side menu on the left side of the screen.
- You can view the following options under the Support category in the side menu.
- Customer Care : To Contact the Support Team for any assistance.
- Help : For any assistance, Please contact us.